Modelling Page
Most of your modelling will be done in the Advanced Modelling section. This is also the page you will see when choosing a project from your list of projects.
Explore Button
Whenever you make changes in the working panel they will not be applied until you press the 'Explore' button.

Undo Button
To restore your project to its previous state, simply click the "Undo" button, which will reverse any modifications made during your modelling.

Filter Data
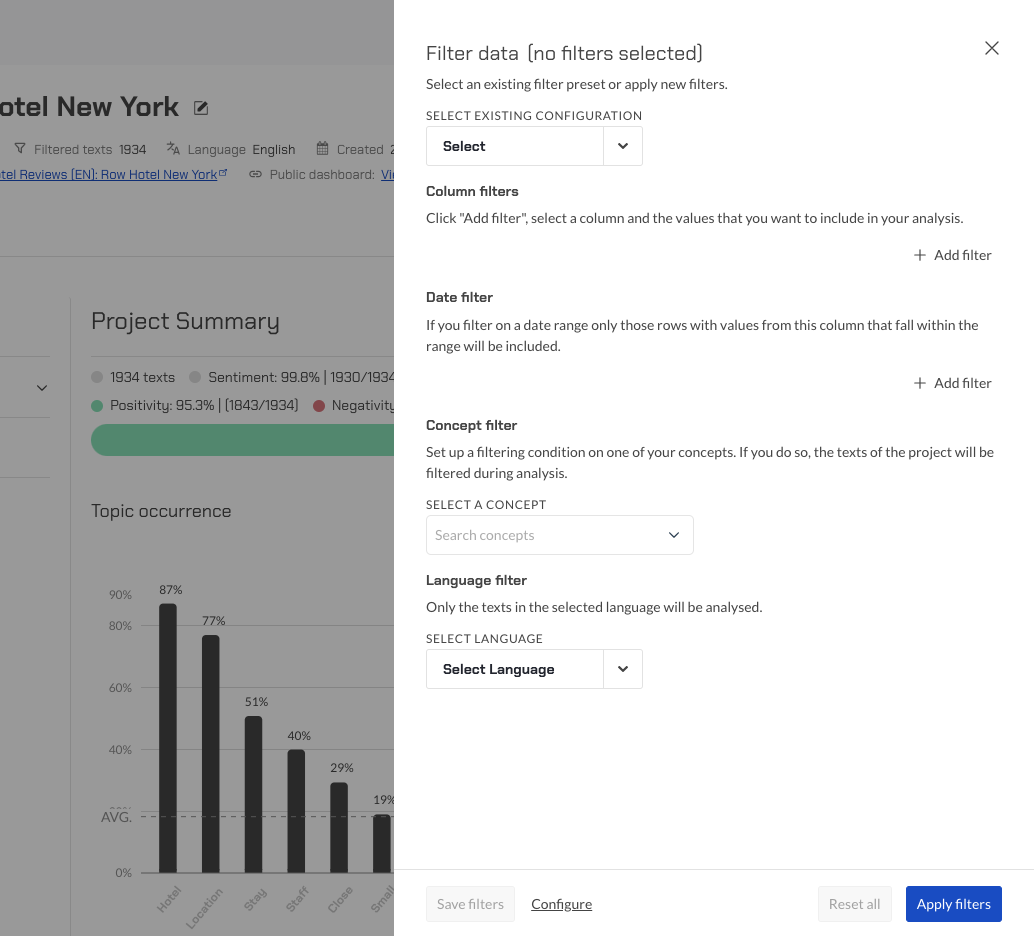
Once you have explored your project for the first time through the project creation flow, you can also (optionally) set up filtering conditions on your data by clicking the Filters button.

A side panel will open where you can apply different types of filtering: filters by column or metadata information, by date, by concept or by language.

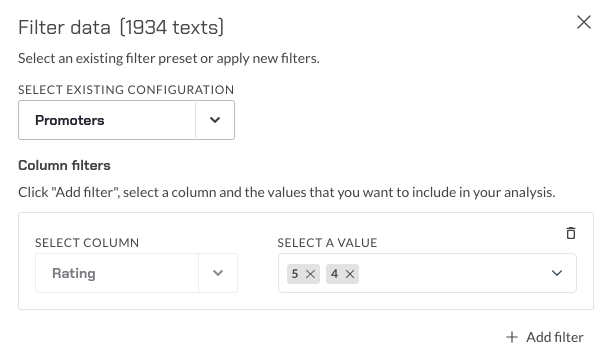
Filter Conditions by Metadata
It is possible to establish filtering conditions for values originating from columns other than the main text column. In the drop-down menu, you will find a list of columns that are suitable for filtering - specifically those columns containing a limited set of values that are repeated frequently, such as ratings or gender. Subsequently, you can select which values should be used for filtering in that particular column.

One approach to analyzing a large dataset in Explorer is to apply filtering conditions to divide the data into smaller groups. For instance, when examining employee reviews of a large company, it may be useful to divide the data by company department or gender. Additionally, filtering based on the level of respondents' satisfaction, by selecting specific values of ranks or ratings, can provide further insights into the data.
Filtering by columns can also be useful when dealing with a large amount of data that cannot be analyzed in its entirety using Explorer. In such cases, data can be filtered based on time periods, such as on a monthly basis, to enable more focused analysis.
Filter Conditions by Date Range
It is also possible to filter data by date. To do so, select the Date range filter drop-down menu and choose the appropriate column that contains the date information. You can then specify a starting date, ending date, or both to filter data within a specific range.

Concept Filtering
You may also filter your project's data based on your created Concepts.
For more information about creating and using concepts see The concept modeller.
Concepts can be used to qualify the texts that are part of your current analysis - texts will be included in the analysis if they match the configuration of the concept filter. This can be done when producing a report (as described in the target concept), and it can be done when exploring a project interactively.
A concept filter works by looking for its terms in the texts of the project, and depending on the settings described below, matching texts will be included or excluded in the analysis. Texts are matched on any terms in the concept and for a match to be valid it must be exact.

Languages Filtering
Optionally, you can establish a filtering condition for a specific language available in the project. To do so, select the desired language from the drop-down menu, which contains all the identified languages, and then re-explore the project. This will enable the analysis of only the texts written in the selected language.
When you switch languages, the project's current model will be cleared but we will present the option to save the project's pinned groups and ignored terms as a template model. You can choose to continue without saving the model if you prefer.

Saving filter sets
At the bottom of the filter panel, the user can save a filter configuration so it can be re-used.


Project Summary
The first entry in the left panel is the 'Project Summary'. Click this to see an overview of your project-wide sentiment, as well as the topic occurrence, which shows the current topics in your data and the distribution of their sizes. You can easily see, for example, if you have many similarly sized topics, if you have just a few large topics and many very small topics, or other shapes of distribution.
Topics
In this part of the Advanced Modelling page, you will see a list of topics that Explorer has identified and that you now can modify by modelling. The amount of topics returned can be modified on the Project Settings page.

Filters
Click on the 'Filters' toggle to show or hide the different view filters. Here you will find important buttons that you need to use continually when analyzing data with the Explorer. If you know how to use these buttons correctly, it will help you to analyze your data with Explorer more easily.
Sorting
The default behaviour of the Graphical User Interface is to sort topics by descending prevalence (i.e. the number of texts in which they feature). In the 'Sort by' dropdown menu you can change this behaviour to 'Alphabetically' which sorts your topics in alphabetical order by their labels, or to 'Pinned' which primarily sorts them by their pinned status and then by occurrence (For more information on pinning and unpinning, see the section below on topic level buttons). Topics inside a group will also be sorted within that group.

Filter by pinned topics
Checking this box will display only the pinned topics in your project. Unpinned topics will be hidden.
Filter by rule-based topics
Checking this box will display only the rule-based topics in your project. All other types of topics will be hidden.
Term Suggestions: Only new suggestions
For every topic in your project, the Explorer suggests additional terms from your data which could also be relevant to your topic. As you progress with your exploring, it is likely you will add extra terms to your topics as you see fit. As the suggestions for a topic are based on the terms it already contains, new suggestions will occur each time you save and update your project (assuming new items have been added). Checking 'only new suggestions' will make the interface display only the suggestions that are based on the most recently added terms, hiding those that have already been seen.
Term Suggestions: Coherence for suggestions
As previously mentioned, the suggestions for any particular topic are based on words that are semantically similar to the existing topic terms. As a result, as the number of terms in your topic gets larger, the number of suggestions increases. For larger topics, the list of suggestions can become very long. To make such a list easier to read, you can check the "coherence for suggestions" box. This means that the system will only display words that are semantically similar to a significant number of the existing topic terms, providing a more coherent list. Otherwise, the default setting shows words that are semantically similar to any single term in the topic.
Searching
Use the 'Seach for a topic' bar to filter your topics by entering (parts of) their label.
Topic-level Buttons
Below the search bar you can find the list of current topics. Each topic has its own small panel with buttons related specifically to that topic.
Pin Button
Each topic has its own pin button. When you pin a topic by pressing this button, it tells the Explorer that you want to always keep track of this topic in your list, regardless of its frequency. The Explorer usually displays the N most frequent topics, where N is customizable by the user (Project Settings - Modelling). The pinning functionality is particularly relevant when you filter texts, remove terms or add data. It can also be useful to keep track of a topic which is very small but very important. Other significant applications of pinning are when you create models from your existing projects (see chapter 8) or when you export the result of your analysis in a full MS Excel format (Save as Excel and Full CSV).
Ignore Button
Next to the pin button you can find the ignore button. Clicking on this button removes all terms in a topic from the analysis, so they cannot form new topics.
Ignored Terms
Here you can see all terms that are excluded from your analysis (read more about ignoring terms here). Ignored terms are not used to form topics. You can return them back to your analysis at any point by clicking on the x icon next to their label.